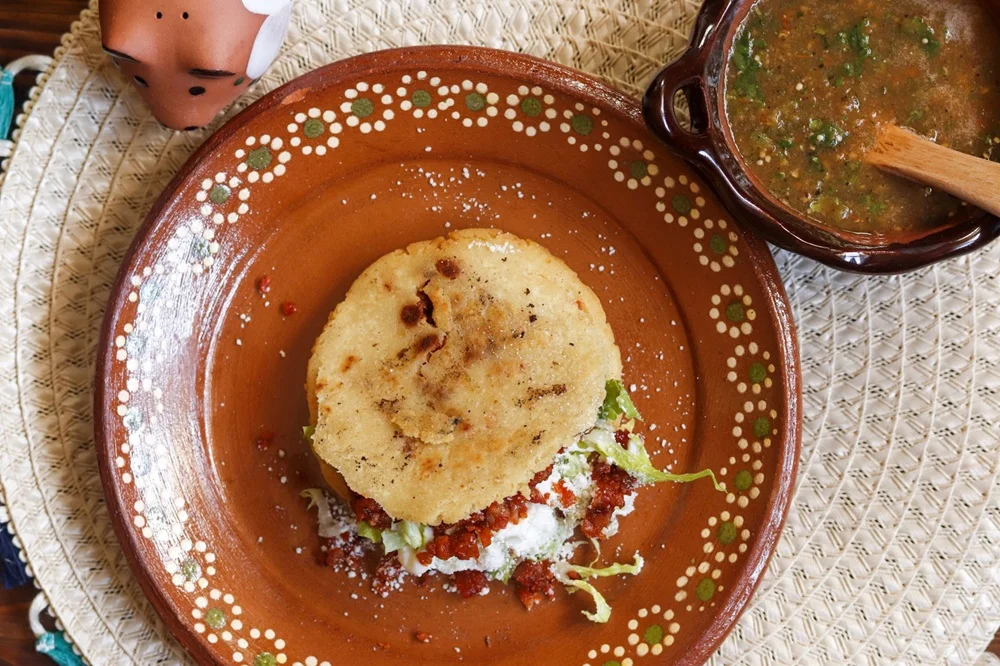
There’s something deeply comforting about a freshly made gordita warm, pillowy, and perfect for cradling your favorite fillings. These thick, handmade tortillas are a cherished part of Mexican cuisine, with their name meaning “little fat one” in Spanish, a tribute to their hearty texture. Traditionally cooked on a comal (a flat griddle) or deep-fried for extra crispiness, gorditas have countless regional variations, each reflecting the rich diversity of Mexico’s culinary traditions.
Why I Love This Recipe?
I’ll never forget my first gordita from a small, family-run taquería in Mexico City. The scent of freshly ground masa sizzling on the griddle, the deep, earthy aroma of corn, and the perfectly charred edges filled the air. That first bite was pure magic—crispy outside, soft inside, and packed with the bold flavors of slow-cooked carnitas and bright salsa verde. It was a moment of pure joy, one that instantly made me fall in love with this humble yet incredible dish.
Now, making gorditas at home is my way of reliving that experience. I fill them with everything from smoky barbacoa to creamy refried beans and tangy queso fresco, customizing each one to fit my cravings. Whether pan-cooked or fried, stuffed or topped, gorditas are endlessly versatile—a true blank canvas for creativity in the kitchen.
Gordita Recipe
Equipment
- Mixing bowl
- Measuring cups & spoons
- Tortilla press or rolling pin
- Non-stick skillet or griddle
- Spatula
- Damp towel
Ingredients
- 2 cups masa harina
- 1 ¼ cups warm water
- ½ teaspoon salt
- 1 tablespoon vegetable oil
For Cooking :
- ½ cup vegetable oil
Instructions
- Step 1: Prepare the DoughIn a mixing bowl, combine masa harina and salt.Gradually add warm water, mixing with your hands until the dough comes together. It should feel soft and pliable, not dry or sticky.Knead the dough for 2–3 minutes, then let it rest covered with a damp towel for 5 minutes to allow the masa to hydrate fully.
- Step 2: Shape the GorditasDivide the dough into 8 equal balls (about the size of a golf ball).Using a tortilla press or rolling pin, flatten each ball into a 4-inch round that is about ¼-inch thick.
- Step 3: Cook the GorditasHeat a non-stick skillet or griddle over medium heat. If frying, heat oil in a deep skillet.Place a gordita on the dry skillet and cook for 2 minutes on the first side, until lightly browned.Flip and cook for another 2 minutes until golden spots appear.If frying, heat oil to 350°F (175°C) and fry each gordita for 30–45 seconds per side until puffed and golden.Remove and drain on paper towels.
- Step 4: Slice & ServeLet the gorditas cool slightly, then carefully slice them open halfway like a pita pocket.Fill with your favorite ingredients and enjoy!
Related Video
Notes
- Hydration is Key – If the dough cracks while shaping, add a little more water (1 teaspoon at a time) to keep it pliable.
- Don’t Overcook – If cooked too long, gorditas can become too dry and tough. Keep an eye on them while cooking.
- Press Evenly – For uniform cooking, ensure the gorditas are evenly shaped and not too thin.
- Let Them Rest Before Slicing – Cutting them too soon can cause them to tear. Let them cool for 1–2 minutes first.
- Customize Your Fillings – From meats to beans and cheese, gorditas are highly versatile. Get creative with your toppings!
Nutrition
Serving Suggestions For Gordita
One of the best things about gorditas is their versatility. Whether you prefer a classic, traditional approach or something more creative, these serving ideas will take your homemade gorditas to the next level.
1. Classic Stuffed Gorditas
The traditional way to enjoy gorditas is to split them open and stuff them with your favorite fillings. Try shredded chicken with chipotle sauce, slow-cooked pork carnitas, or sautéed mushrooms with queso fresco for a vegetarian option.
2. Open-Faced Tostada-Style
Instead of cutting them open, top your gorditas like a tostada. Spread a layer of refried beans, add some crumbled chorizo, and finish with fresh avocado slices and a drizzle of crema.
3. Breakfast Gorditas
Kickstart your morning with a hearty breakfast dish! Fill them with scrambled eggs, crispy bacon, and a sprinkle of cotija cheese. A side of salsa roja adds the perfect amount of heat.
4. Sweet Gorditas
Yes, you read that right! For a unique twist, serve gorditas as a dessert. Brush them with melted butter, sprinkle with cinnamon sugar, and drizzle with honey for a warm and comforting treat.
However you choose to enjoy them, this recipe are guaranteed to satisfy. Whether savory or sweet, they’re the perfect balance of texture and flavor.
Try this also : Marry Me Chicken Pasta Recipe
Variations of Gordita
There’s no single way to make a gordita, which is what makes them so fun! Here are four ways to put your own spin on this classic Mexican dish.
1. Blue Corn
Swap out regular masa harina for blue corn masa for a nuttier, slightly sweeter taste. The deep purple hue also makes for a striking presentation!
2. Cheese-Stuffed
For extra indulgence, mix shredded cheese directly into the masa dough before cooking. When heated, the cheese melts into the dough, creating a crispy, cheesy crust.
3. Vegan
Replace lard or butter with coconut oil, and fill your gorditas with sautéed veggies, refried black beans, and a dollop of cashew crema for a fully plant-based version.
4. Spiced
Enhance your masa with a pinch of chili powder, smoked paprika, or cumin to give your gorditas an extra depth of flavor.
Experimenting with these variations lets you tailor dish to your taste, making them an exciting addition to your meal rotation.
Storage & Shelf Life of Gordita
Making a big batch? No worries! This recipe store surprisingly well, so you can enjoy them throughout the week.
1. Refrigeration
Once cooled, store cooked gorditas in an airtight container in the fridge for up to 3 days. To reheat, warm them on a dry skillet for a few minutes on each side.
2. Freezing
For longer storage, freeze gorditas by placing parchment paper between each one and sealing them in a zip-top bag. They’ll stay fresh for up to 2 months.
3. Reheating Frozen
Reheat frozen gorditas straight from the freezer by placing them on a warm skillet or in a toaster oven at 350°F until soft and heated through.
4. Storing Uncooked Dough
If you prefer fresh-cooked gorditas, store uncooked dough in the fridge for up to 2 days, wrapped tightly in plastic. Just shape and cook them when ready!
Proper storage ensures that your recipe stay fresh and delicious, whether you’re enjoying them right away or saving them for later.
Health Benefits of Gorditas
This recipe aren’t just delicious—they can also be a nutritious addition to your diet, depending on how they’re prepared!
1. Rich in Fiber
Made from masa harina, gorditas provide a good amount of fiber, which supports digestion and helps keep you full longer.
2. Naturally Gluten-Free
Because masa harina is made from corn, gorditas are naturally gluten-free, making them a great option for those with gluten sensitivities.
3. Packed with Essential Nutrients
Corn masa is a good source of B vitamins, iron, and magnesium, all of which are essential for energy production and overall well-being.
4. Customizable for Healthier Eating
By using whole food ingredients like lean proteins, fresh vegetables, and healthy fats, you can make gorditas as nutritious as they are tasty!
Balanced and satisfying, this recipe can be a wholesome meal option when made with fresh, high-quality ingredients.
Frequently Asked Questions (FAQs)
Q: Can I make it without a press?
A: Absolutely! Just use a rolling pin or flatten the dough with your hands. A small plate can also work—just press it down evenly to get a uniform shape.
Q: Do I have to deep-fry it?
A: Nope! While some versions are fried, you can also cook them on a dry skillet or griddle for a lighter, equally delicious alternative.
Q: Can I use regular flour instead of masa harina?
A: Traditional recipe are made with masa harina, but if you want a flour-based alternative, you might prefer making thick flour tortillas instead.
Q: What’s the best way to prevent it from cracking?
A: Make sure your dough is moist but not sticky. If it’s too dry, add a little more water a tablespoon at a time until the consistency is soft and pliable.
This recipe are one of those recipes that bring people together. Whether you’re making them for a casual weeknight dinner or a festive gathering, they never fail to impress. With a crispy yet tender texture and endless filling possibilities, they offer a comforting bite of authentic Mexican flavor.